Arduino - Bit Shift
In this article we are going to display a simple bit shifting on the 8x8x8 rgb LED cube
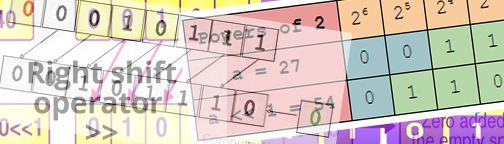
There are two bit shift operators in C++, << the left shift operator and >> the right shit operator. After the operator you declare the amount of bits to be shift left or right. This can be very useful to build LED animations and can save you SRAM memory. At this point I have a lot sketch of LED animations, and I came across of this very clever way to display LED on and off by using bit 0 or 1. In this case apply for the rgb LED cube main function related to the r,g,b values which is 0-15 for each color. So we create three variables one for red, one for green and one for blue. Then we decide which color to display by assign 0 or 15 to each of the variables. After when we run the variables with their values in a loop, the results from the loop will be 0 or 1 so that we multiply to the values of the variables we assign to. Another way to look at, if we assign a color green 15 and if the result from the loop is 0 the green led will be off, because 15x0=0 and if the result from the loop is 1 the green led will be on, because 15x1=15. For this demonstration we will have three examples of bit shifting, the first one is a single byte shifting right and left, the second one a byte array shifting and third is a byte rotation. First example bellow.
void bitshift(){
  byte mydatax = 0x38;
  int mydata;
  int rCol=0,gCol=0,bCol=15,t=1000;

  for(int i=0; i<3; i++){
    for(int k=0; k<8; k++){
       mydata = bitRead(mydatax,k);
      LED(0,0,k,rCol*mydata,gCol*mydata,bCol*mydata);
    }
    delay(t);
    clean();
    mydatax = mydatax >> 1;
  }
  for(int i=0; i<3; i++){
    for(int k=0; k<8; k++){
       mydata = bitRead(mydatax,k);
      LED(0,0,k,rCol*mydata,gCol*mydata,bCol*mydata);
    }
    delay(t);
    clean();
    mydatax = mydatax << 1;
  }
}
The mydatax byte is 00111000, then the mydata variable which will get each bit of mydatax, then the r, g, b variables with their values and a delay time. The first two loops will display the mydatax and then shift to the right three times by 1. The second two loops will shift the mydatax to the left three times by 1. Notice the second two loops display the mydatax with the values from the first two loops and just move back where it was from the beginning.
And the bit shifting here is, 00111000 >> 00011100 >> 00001110 >> 00000111 << 00001110 << 00011100 << 00111000.
For this second example we are going to shift the whole array of bytes.
void bitshift(){
  byte A[] = {0x66,0x66,0x66,0x7E,0x66,0x66,0x3C,0x00};
  int mydata,x,i,t=1000,r=0,g=15,b=0;

    for(int ii=0; ii<2; ii++){
      for( i=0; i<8; i++){
        if(ii>0){
          A[i] = A[i] >> 1;
        }
        for(int k=0; k<8; k++){
          mydata = bitRead(A[i],k);
          LED(i,7,k,r*mydata,g*mydata,b*mydata);

        }
      }
      delay(t);
    }
    for(int ii=0; ii<2; ii++){
      for( i=0; i<8; i++){
          A[i] = A[i] << 1;
        for(int k=0; k<8; k++){
          mydata = bitRead(A[i],k);
          LED(i,7,k,r*mydata,g*mydata,b*mydata);

        }
      }
      delay(t);
    }
}
The example above we have an array of bytes which is the letter A, then the variables we need notice that I just change the variables of the color to be short. The if statement on the first block of for loops is to begin at the start point then after the first loop start shifting the bytes to the right. The second block of for loops it will bring back and start shifting to the left. Notice that here we are dealing with 1 byte = 8 bits, if the shifting process falls off the 8 bits range those bits is gone for ever and will not come back. For example if I would change the very first loop to 3 times instead of 2, part of the right leg of the letter A would be gone and the second block of loops would bring back the rest but not those bits.
Above are the two examples of the byte array shifting, the second clip I had changed the top two loops to 3 times and now you can see that it falls off the range of 8 bits and those bits are gone.
The third example shows a byte rotation by replacing those bits that were gone and place them at the other end of the byte. First we create a function which will do that for us. The byte value is the each byte from the A[] array, the int amount is the amount of bits to be shift, the number 8 is the byte.
byte rotateRight(byte value, int amount) {
    return (value >> amount) | (value << (8 - amount));
}
void bitshift(){
  byte A[] = {0x66,0x66,0x66,0x7E,0x66,0x66,0x3C,0x00};
  int mydata,t=500,r=0,g=15,b=0;

  for(int ii=0; ii<8; ii++){
      for(int i=0; i<8; i++){
        A[i] = rotateRight(A[i],1);
        for(int k=0; k<8; k++){
          mydata = bitRead(A[i],k);
          LED(i,7,k,r*mydata,g*mydata,b*mydata);
        }
      }
      delay(t);
  }
}
The first loop will go around eight times and each time delay each shift process. The second will enable all the layers plus will serve as index for the A[ i ] array, next we call the rotateRight function will shift each byte of the array by 1, then the mydata variable will get each bit already shift and display. The process looks like a scrolling text matrix.
CONCLUSION:
There are a lot things you can do with bit shift, in this case to build animations for the LED cube. You just have to be creative.